When Lisa Marie and I started planning our new primary bathroom, we agreed on one thing right away. We had to use Schluter Systems to ensure the wet-room bathroom waterproofing...

Indoor Fall Home Maintenance Checklist
By Mike Holmes
Mike’s Advice / Home Renovation
Thursday, August 1st, 2024 @ 10:13pm
Fall Maintenance Tips To Get Your Home Ready For The Winter
Small home maintenance tasks that are neglected will cause you problems in the long run. I always advise homeowners to do their home maintenance from the outside in because what’s inside needs to be protected from the elements. It’s also important to test your smoke alarms, carbon monoxide detectors, fire extinguishers, and all ground-fault circuit interrupters. There is a laundry list of things to think about when preparing your home for the impending fall and winter months! That’s why I love having checklists.
Checklists are a great guide and I’d even suggest scheduling reminders in your phone or online calendar. Having seasonal checklists is one option, but you can also divide the checklists into “exterior” and “interior” tasks.
Here is your indoor fall maintenance guide to get your home prepared for the next season.
Interior Maintenance Checklist
- Check sealing and insulation, and update if required
- Add or replace weather stripping
- Inspect or schedule a maintenance service call for HVAC
- Check all detectors in your home (carbon monoxide and smoke detectors)
- Check Attic, Basement, and Crawl Spaces for Leaks and Moisture
- Check Floor Drains
- Check for Condensation and Humidity
- Check and Reset Ground Fault Circuit Interrupter – GFCI
- Check Your Ventilation Fans Are Working Properly
- Check all detectors in your home (carbon monoxide and smoke detectors)
Sealing and Insulation
Reducing the amount of air leaking in and out of your home is a cost-effective way to cut heating and cooling costs, improve durability, increase comfort, and create a healthier indoor environment.
In the winter or on chilly days, adequate insulation and sealing prevent the heat from escaping and the cold air from entering your home. It does the reverse in the summer months or on hotter days.

I’m a big fan of spray foam, which has a lot of insulating power. Remember, this is a project that’s best left to the pros.
Insulation and sealing also help control your home’s thermal condition by creating a balance within the building. It can also help reduce any noise pollution.
RELATED:
Windows & Door Insulation
You need to consider more than just the walls and ceilings when it comes to home maintenance. In order to prevent heat loss and cold drafts, it’s important to make sure your windows and doors are properly sealed.
Examine your window and door frames first, then seal any gaps or cracks by using weatherstripping or caulking. We use SikaBoom on all our projects. It’s a low-expansion, all-season polyurethane foam. Perfect for insulating, air sealing, and blocking out dust, noise, and drafts.
It comes with this straw, so you don’t need any extra equipment to install it. Not only is SikaBoom easy to use, it is long-lasting, has low VOCs and is environmentally friendly, which I like.

Once you’ve filled the gaps around the windows, use the SikaFlex Insulation Sealant/Adhesive to weather seal around the exterior of the window and door frames.
Fix Cracks In The Interior Foundation Of Your Home
Cracks in concrete floors or walls in your basement, especially if it’s unfinished, can be more than just an eyesore. While it may not appear to be a major concern at first look, if left ignored, they can lead to bigger issues down the line, which may cost you much more than getting them fixed now.
Not to mention, cracks in your foundation can let in water, inviting mould and weakening your home. They’re also an open invitation to pests and can mess with your energy bills, too. So, don’t ignore them!
Sikacryl® PowerSet Instant Concrete Repair
While larger, structural cracks should be handled by professionals, small cracks can often be repaired by handy homeowners and DIYers. I recommend using a product like Sikacryl® PowerSet Instant Concrete Repair. This is a two-part gap filler that has been carefully developed to fill cracks in vertical and horizontal cementitious surfaces.
The Sikacryl® PowerSet Instant Concrete Repair provides a strong and durable bond, making sure that the repaired area remains secure. It’s also fast setting so you can check this item off your list in a couple of hours. Here’s how it works:
- Preparation: Start by cleaning the crack and removing any loose debris or dust. A wire brush and a vacuum cleaner can help with this.
- Crack Filling: Unscrew the cap. Pull the red plug and cut the plastic behind the clip attached to the red plug. Then, attach the mixing nozzle over the cut plastic and insert the cartridge into a standard caulk gun. You will want to squeeze the gun a few times to dispense the material through the nozzle. Discard the first part of the material you have just squeezed out. Do this a few times until you see a uniform gray color and then it’s ready to apply to your cracks.
- Finishing Touch: Once the repair has cured, consider smoothing the surface with a trowel or a putty knife to ensure it blends seamlessly with the surrounding area.

Sikacryl® PowerSet Instant Concrete Repair is being applied to a vertical crack in a concrete wall.
RELATED:
Weather Stripping
Check the weather stripping around doors and windows twice per year. Once in the spring, and again in the fall. Weatherstripping is a simple and efficient way to help manage your energy bill and prevent drafts. When weather stripping gets old, it breaks and the foam disintegrates allowing unwanted drafts to creep into your home.
RELATED:
There are two types of weather stripping; nail-on and peel-and-stick. Nail-on weather stripping is typically used with wooden frames but you can also use peel-and-stick. Peel-and-stick stripping is either foam or felt and is easy to apply.
Inspect the House Heating System
A professional inspection of your HVAC systems should be performed once a year. If you have a furnace or a typical central air conditioner, you may want to do this twice a year —when homeowners typically switch from using air conditioning continuously to using heat continuously.
A clean and well-maintained furnace will be less likely to break down, and have serious leaks, like carbon monoxide, and will generally run better and last longer. You’ll also save money on your energy bills, as your furnace won’t have to work as hard. Plus, peace of mind, knowing you are prepared for the colder months ahead.

I recommend changing your filters at least every 3 months, minimum. In fact, place with clean filters at the start of every season so it’s easy to remember.
If you have a heat pump, this should be serviced every six months, especially if it is used all year long.
RELATED:
Check and Test the Detectors in The House
Every home needs smoke and carbon monoxide detectors, in order to keep you and your family safe. It’s also the law. Both carbon monoxide and fire alarms can be hardwired or battery-operated. CO2 alarms also come in plug-in versions.
Smoke Detectors
Smoke detectors are essential for saving lives, but they need to function properly. Every month, test the units. The smoke detector’s test button should be pressed and held down. After a few seconds, the smoke detector should start to emit a loud, deafening siren when the button is touched.
Smoke alarms must be installed on each story of the home and outside sleeping areas. Because smoke rises, smoke alarms should be installed on the ceiling. If this is not possible, install the alarm high up on a wall.
When the low battery warning alarm goes off, replace the batteries right away. Even if the low-battery alarm doesn’t go off, change your batteries yearly or every six months. Not to mention, smoke alarms should be replaced with newer models every 10 years. And as you are cleaning, remember to vacuum your smoke alarms with a brush attachment to clean any dust and debris.

Replace your smoke alarm batteries every time you change your clocks. You will also want to test them monthly to make sure they’re working
Carbon Dioxide Detector
It is strongly advised that carbon monoxide detectors be installed on every story of the home. If your home has a fuel-burning appliance, a fireplace or an attached garage, you must have a working CO alarm adjacent to each sleeping area of the home. Carbon monoxide detectors will prevent carbon monoxide poisoning in homes that have furnaces, stoves, generators, and gas water heaters.
Check Your Attic, Basement, And Crawl Spaces for Leaks and Moisture
Although it may appear to be just empty space, an attic can tell you a lot about your home and any problems that need to be fixed, so make sure you inspect your attic regularly.
Spring and fall are good times to schedule an inspection, especially if it’s raining. Even without a professional inspection homeowners can do a quick visual inspection to look out for black mould, mouse droppings, and water stains.

Most commonly, the presence of mould will cause a musty smell. Mould in the air outside can also attach itself to clothing, shoes, and pets, and be carried indoors.
Airflow, measuring insulation, and taking into account proper ventilation are all elements that need to be managed for optimal conditions in your attic, basement, or crawlspace.
RELATED:
Check Floor Drains
When it comes to cleaning your sewer drain, you want to do it often enough to prevent clogs from forming. Most plumbing professionals will tell you that sewer drain cleaning is most effective when performed once every 18 to 22 months.
Your drains may need maintenance if you are experiencing standing water in sinks, bathtubs or showers, gurgling in toilets, or strange sounds coming from sinks. When water is coming up via a drain, you need to get your drain checked.
RELATED:
A strong sewer smell coming from your basement is most often caused by a dried-out floor drain, a bad ejector pit seal, improperly vented appliances or fixtures, or even a damaged sewer line. Floor drains in your basement are typically the source of sewer stench.
Check for Condensation and Humidity
Moisture is created every day in our homes through cooking, cleaning, doing laundry, taking showers or baths, plants, or just breathing. The amount of moisture or water vapour in your home can be determined by measuring the humidity. The ideal humidity or moisture level in a home should be between 35 – 45%, depending on a number of factors. The simplest way to test the humidity level in your home is to use a hygrometer.
When humidity levels are too high or too low this can lead to a number of issues for your home and your family. Some signs that you have humidity problems include, noticing moisture or condensation on your windows. You may even notice puddling on your window sills. Typically, the warmer the home, the more moisture is generated.
Left untreated there is the potential for mold and rot damage throughout your home. Running a dehumidifier will help get rid of some of that moisture but depending on the circumstances you may need something more effective, like an efficient air exchange system. Installing an ERV or HRV could have a dramatic effect on your indoor air quality as they continually exchange the indoor air with fresh outdoor air.

Installing a Panasonic ERV (energy recovery ventilator) in my home.
In air-conditioned homes, (humidity levels outside are higher than inside), your ERV system will limit the amount of moisture coming into your home. In humidified homes, (when the humidity level is low in winter), ERV systems limit the amount of moisture expelled from your home.
Clean Your HRV or ERV System
I’ve talked a lot about HRVs and ERVs, as they are great additions to any HVAC system, and when well-maintained they will perform optimally, helping your indoor air to stay healthy and moisture level maintained.
The filters in these units can be removed and cleaned using warm water and mild soap. Once fully dried can be placed back in the units. Most new units will have an alarm or indicator notifying you that a filter needs to be changed or cleaned – typically every 2 to 3 months and the air filter should be inspected every 90 days and replaced every 6 months.
RELATED:
Check and Reset Ground Fault Circuit Interrupter – GFCI
A ground fault circuit interrupter outlet (GFCI outlet) is a safety feature created to cut the circuit if there is an imbalance of incoming and outgoing current. The GFCI is a device that’s used to protect a person from electrical shock near water.
RELATED:
What Are Ground Fault Circuit Interrupters (GFCIs) And How Do They Work
How To Test a GFCI Outlet
On your GFCI outlet, there should be two rectangular buttons, labeled “TEST” and “RESET.” To test your GFCI all you have to do is press the test button. What this will do is simulate a short to ground or neutral. You should then hear a snap sound and see the RED RESET button pop, as that trips the outlet and cuts off the power.
Plug a lamp into each half of the outlet to confirm that the power has been turned off. The devices should not turn on. After confirming that the safety function is working properly, press the reset button to restore power to the outlet. Make sure to always follow the manufacturer’s testing schedule recommendations —sometimes these can be monthly.
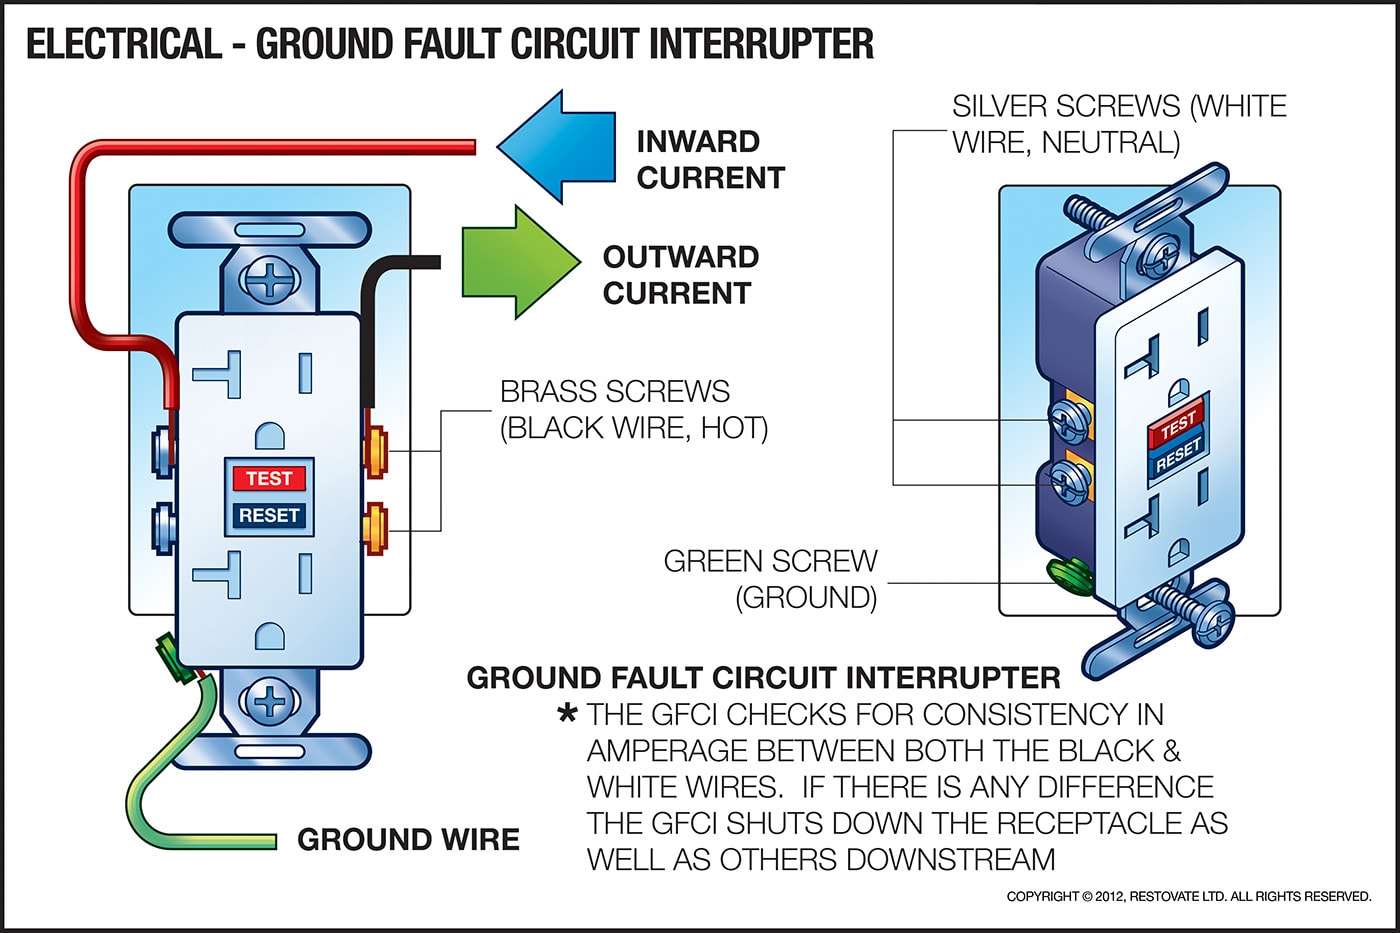
How do GFCIs work Illustration
What Happens If The GFCI Will Not Reset
If the GFCI won’t reset or the “test” button doesn’t come out when you press it, there might not be electricity going to the GFCI or the GFCI could be damaged. Unsafe current leaks may exist somewhere on the circuit if the “reset” button trips repeatedly when you click it.
If you have any doubts, contact a Licensed Electrical Contracting business to do some troubleshooting. It may be a faulty outlet or it may be something more serious, but it’s always best to be safe and get it checked by a pro.
Tip: Always look for the ECRA/ESA (in Ontario) number on the Electrical contractor’s vehicle. In fact, the ECRA/ESA number needs to be clearly displayed in all written communications, contracts, advertisements, on business property and in any situation where you interact with the general public. You can find a LEC at FindAContractor.esasafe.com
Check Your Ventilation Fans Are Working Properly
A fan is only effective if it is working properly and is installed properly. Exhaust fans need to exhaust to the outside, not inside a wall, ceiling or attic space. So, how do you know if your fan is working? Well, there are a couple of tests you can do to make sure your fan is extracting the air out of the indoor space, like a bathroom or kitchen.
What Is The Tissue Test To Check Your Ventilation System Is Working
I’m a big fan of the tissue test, as it is an easy and simple way to get an idea that your fan is working correctly. Take a tissue and hold it up to the fan grate, if the tissue sticks to the grate, then you know the fan is sucking the air out of the room. You can also use baby powder, give the bottle a squeeze and if the powder gets sucked up then your fan is working properly.
Bathroom Vs. Kitchen Ventilation Fans
If you have an old fan, I would recommend replacing it with a new more efficient, and powerful fan, like for ENERGY STAR® ventilation options. For bathrooms up to 100 square feet in size, you should have an exhaust fan provide a minimum of 1 cubic foot per minute (CFM) per square foot of floor space. I’d go higher—especially in a larger bathroom, or one with several fixtures or a jetted bathtub.
RELATED:
Kitchen range hood fans tend to be more powerful and louder than bathroom fans and when using an overhead vent hood, an average size range typically needs air evacuation at a rate of 120 CFM.
However, high-capacity exhaust fans and range hoods might result in chimney “back-drafting,” so take care not to overdo it. When air is sucked through the chimneys, potentially harmful combustion exhaust gases may enter the home. To equalize the pressure in the house, you must have a supply-air fan that is compatible with these high-draw fans.

Kitchen by Holmes Approved builder, Habitations CBA
If you have any doubts, consult with a professional or your contractor to find the best solution for your home.
RELATED:
Clean-Up List
- Clean the internal parts of Air Conditioners
- Inspec and clean your humidifier and water heater
Clean the internal parts of Air Conditioners
Before you cover your AC for the season, make sure the area surrounding it has been cleared of debris, like leaves and twigs, and give it a wipe-down. Cover your air conditioner unit with a protective waterproof cover to help insulate and protect your unit from cracking, debris, and the elements. A waterproof tarp secured with bungee cords is a good alternative if you’ve misplaced the cover.
You should also call someone to inspect and service your AC. This will include the replacement of filters, inspection of indoor and outdoor coils, condenser pump, thermostat, and general cleaning of the unit.
How To Maintain AC Window Units
Window units should be removed, cleaned and checked for any damage or wear according to the manufacturer’s instructions. Coils can be cleaned by using compressed air. Use warm water and mild detergent or vinegar to do a wipe-down to remove any dirt from the condensation pan at the base of the unit.
The best place to store window units is in a basement or utility room, and make sure the unit is thoroughly dry before storing. If you must leave the unit in the window during the off-season be sure to use an air conditioner cover that is specifically designed for external use and protects it against the elements.
Clean Your Humidifiers And Water Heaters
Clean Humidifiers
For portable humidifiers, vinegar can be used for cleaning. However, you should not run the humidifier with vinegar in it, as it can irritate your eyes, nose, throat, and lungs. Unplug the unit, fill the base of the humidifier with 1 cup of water and 1 cup of white vinegar and leave it to sit for an hour. The vinegar is a natural cleanser and it’ll help loosen any residue and disinfect the unit.
Check the manufacturer’s guidelines on replacing or cleaning your filter – this should be done regularly.
A whole-home humidifier is installed directly into your HVAC system and brings humidity into your home via ductwork. It is controlled much like your thermostat, providing a consistent level of humidity all year long.
Moisture gets into your home via a water panel. This water panel needs to be replaced or cleaned on a regular basis as it will get clogged with minerals and particles from your water supply, thus affecting the performance of your unit.
Water Heater
To remove the buildup, experts often advise draining and flushing your water heater at least once a year. This makes sure that your system is supplying your home with the most, hot water possible. Check for any leaks around the hot water heater’s base. If you do find a leak, it could be for a couple of reasons, like a loose drain valve, a defective installation, or insufficient maintenance.
Tankless water heaters on the other hand supply hot water on demand so you never have to run out of hot water or run your system when not needed —I love it! It can last for many years and save on energy costs if they are installed and maintained properly.
RELATED:
Other Home Maintenance Items
Organize Your Garage
I find with the change of season there is always an opportunity to do a quick declutter and reorganization of your garage. We use different items in different seasons and there’s always going to be a bit of fallout from it.
Pack up your summer items, and sort them properly so you can make room for your fall and winter items. You might be able to even fit your car so that you’re not clearing the snow all winter. It can get tedious! Give your floor a sweep and clean, drain and store outdoor hoses, check your garage door, and think about some additional storage solutions.
RELATED:
Regular maintenance is key to having a happy and healthy home inside and out. Always review your checklists regularly, and if something doesn’t look right, tend to it promptly. In the end, you will be glad you did!
READ MORE:
Fall House Exterior Maintenance Checklist


