
What are Premium Cellular PVC Siding Pros, Cons, Cost and Long Term Value? This year, at the International Builders’ Show in Orlando, I saw trends and new products that...

Flooring Guide For Your Bathrooms – Dos & Don’ts
By Sherry Holmes
Mike’s Advice / Bathroom Renovation
Thursday, May 21st, 2020 @ 3:13pm
A bathroom is a renovation that you don’t want to cut corners on. All materials need to be selected carefully and with a lot of research to ensure it’s watertight. What can happen if you use poor quality materials and bad installation practices? Well, you are creating a breeding ground for mold and mildew. I won’t say that tiling your bathroom is a DIY project. A lot can go wrong, and you’ll end up spending more money having a pro fixing it down the road.
One of the houses we renovated for a lovely family in Holmes+Holmes included a bathroom reno. The previous contractor had created a big mess. I felt so bad for the family. They have four daughters and were waiting forever to renovate their home. They interviewed three contractors and picked the one that came with a referral. Needless to say, he left them with a disaster.
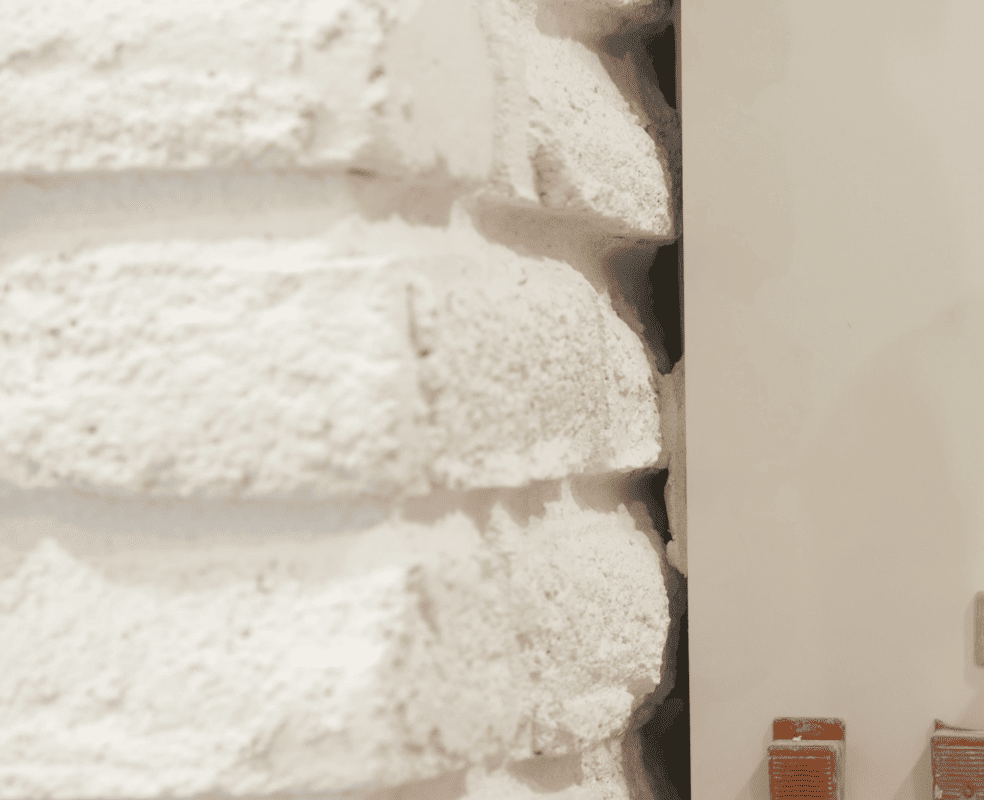
The shower tiles actually had a gap behind them.
My point is, material selection plays a big role in renovations, but it also needs to be installed properly. Take your bathroom floor for instance. You can put down waterproof flooring, but if what’s underneath the tile isn’t properly guarded, you can still develop mold.
REMEMBER
Kitchen and bathroom renovations will give you the best ROI.
Are you considering changing your bathroom floors? Here are a few dos and dont’s of bathroom flooring I want you to keep in mind.
DON’T PUT TILE ON TILE
We see this all the time. Homeowners and even contractors think they can layer new tile on top of existing tile. They think it saves them time. This is just a recipe for your new tiles and grout to crack.
DO CHOOSE YOUR TILES CAREFULLY
For the rest of your house, you can choose a floor based on aesthetics. But when it comes to your bathroom flooring, there are more factors to consider such as protection against moisture, ease of installation and durability. Tile is the best option for bathrooms. It cleans up well and can stand up to water if installed correctly. You need to consider the durability of the tiles as well. Do your research on ceramic tiles, porcelain tiles and vinyl planks.
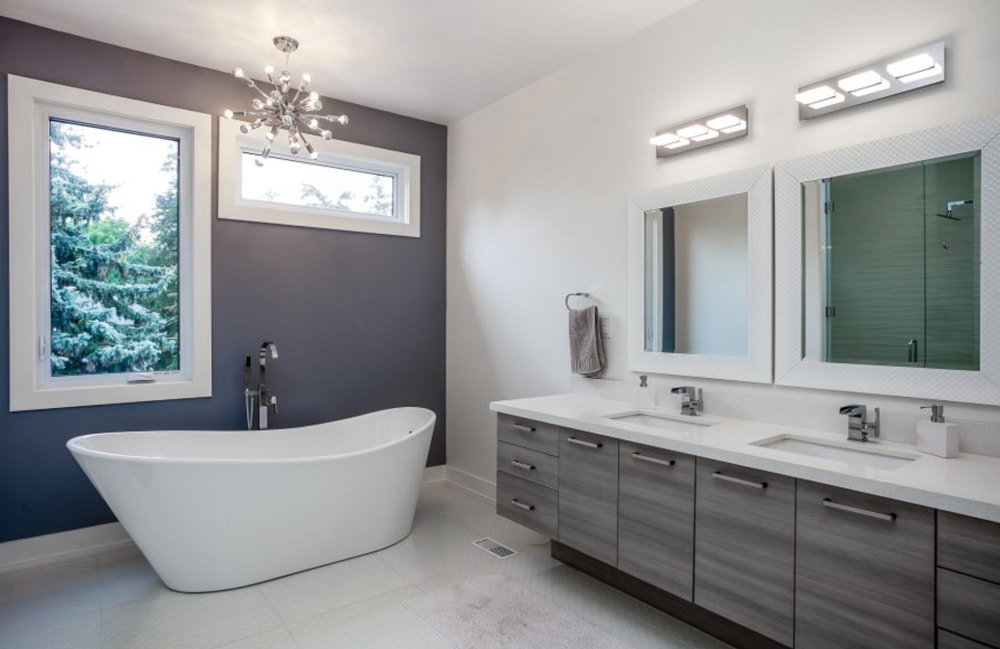
Photo of Holmes Approved Homes builder SalDan
My Pick: Porcelain Tiles
We love installing porcelain tile in bathroom projects. It’s a stronger tile extremely durable and has a very low moisture absorption tendency (good for high moisture areas). Porcelain tiles generally have an absorption rate of under 0.5%. There are many different types of porcelain tiles on the market. You can even buy ones that look like wood, or mix and match and play with the design.
There are other options for bathroom tiles, but do make sure you check the porosity rating of your tile, and make sure you protect it against water.
I love the idea of tiling the entire bathroom. It creates such a clean, seamless look paired with a curbless shower.
Porcelain tiles will cost you an average of $4-$12 per square foot, installed. Vinyl tiles are also durable and easy to maintain and pretty cost effective.
RELATED
DON’T INSTALL HARDWOOD FLOORING
Hardwood flooring is not a good choice for high moisture areas, so stay away! Laminate flooring is an alternative to hardwood, but it is not slip resistant. Moisture can also seep into the unprotected core of laminate flooring and can cause mold issues.
DON’T SKIP THE WATERPROOFING
Assuming your subfloor is in good shape and level, your next step is waterproofing. Put down a layer of unmodified thinset mortar on your substrate which you use to bond your waterproof, uncoupling membrane. Then another layer of thinset mortar on top of the membarne, and finally, you place your tiles. We don’t use modified thinset mortar because it relies on air to cure properly. The tile and waterproof membrane don’t breathe. That means no airflow, and it would take forever to dry.
All floors expand and contract with moisture content. The substrate will expand and contract – and when this happens, you’ll start to see your tiles and grout crack. The uncoupling membrane is key, because it allows the substrate to expand and contract at its own rate, without affecting the tile layer above. You don’t want to skip this step.
DO EXAMINE THE UNDERLAY
Without tearing up the existing floor, you can’t properly judge the state of the underlay. Tear up the old, assess the state of the subfloor, and fix what needs fixing. You don’t want your bathroom floor covering up hidden issues that will lead to mold. As my dad always says, do it right the first time. Don’t take shortcuts when it comes to your bathroom floor.
DO PREP YOUR FLOOR FOR TILE
Leveling your floor is very important before tiling. One way to asses if you have uneven flooring is taking a level and measuring the dip. You can also roll a ball on the floor and see if it moves towards a dip. By taking the extra time to properly make the floor level and true, you can prevent cracks, dips, and even squeaks in your bathroom floor. Plus, tile installation becomes much easier with a level floor.
DO INVEST IN Heated Tile Floors
Who likes putting their feet on a cold floor first thing in the morning? If you are investing in new bathroom floors, I strongly recommend considering in floor heating systems. It used to be that in-floor warming systems only existed for new builds. That’s not the case anymore, they can now be installed easily in an existing bathroom. Schluter’s electric floor warming system includes uncoupling technology in their DITRA-HEAT line, which keeps your tiled floors and grout from cracking.
RELATED
Pro Tip: Always keep a box of extra tiles handy in case you have to replace one in a few years. Replacing a broken tile is a pretty simple process, but finding an exact match years after you laid the original tile? That’s the hard part.
Need some inspiration for your bathroom renovation? Check out 13 amazing bathroom design ideas.
READ NEXT
Related Articles
Sherry Holmes on Her Construction...
In celebration of Women in Construction Week, I thought I'd share my construction journey. People...

Garage Door Secrets You Should...
Choosing The Right Garage Door Choosing the right garage door involves more than just aesthetics....

Tips for Designing Your Perfect...
I'm sure everyone has there opinions on designing your perfect closet. Let’s face it—we could...